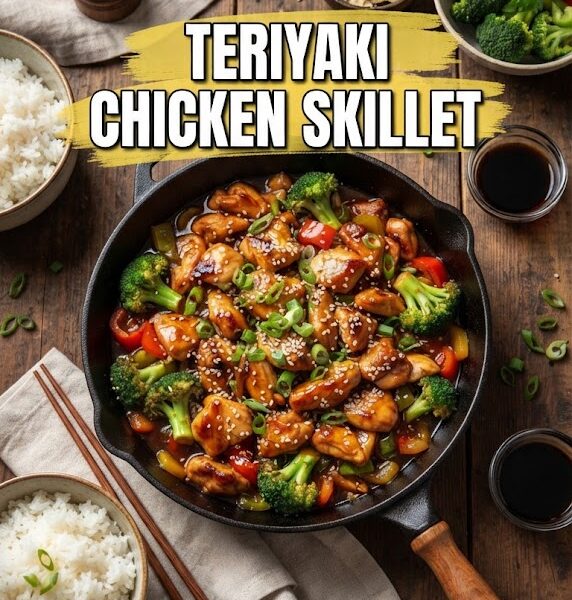
In the fast-paced world of modern culinary trends, few dishes have stood the test of time quite like the Teriyaki Chicken Skillet. It is a masterpiece of balance—hitting the salty, sweet, savory, and umami notes all in a single pan. Whether you are a busy parent looking for a 30-minute weeknight meal, a fitness enthusiast seeking a high-protein dinner, or a gourmet home cook exploring the nuances of Japanese-inspired cuisine, the Teriyaki Chicken Skillet is your ultimate kitchen companion.
This comprehensive guide explores everything there is to know about this iconic dish. From the historical roots of teriyaki sauce to the science of searing the perfect chicken thigh, and from innovative dietary substitutions to meal-prepping secrets, we are diving deep into the art of the skillet.
The Origin Story: Understanding “Teriyaki”
To master the Teriyaki Chicken Skillet, one must first understand what “teriyaki” actually means. Contrary to popular belief in the West, teriyaki is not just a bottled sauce you buy at the grocery store; it is a traditional Japanese cooking technique.
The word is derived from two Japanese nouns:
- Teri (照り): Referring to the “luster” or “shine” created by the sugar content in the glaze.
- Yaki (焼き): Referring to the cooking method of “grilling” or “broiling.”
Traditionally, teriyaki involves dipping or brushing meat with a glaze multiple times during the cooking process. While the authentic Japanese version often uses fish (like yellowtail or eel), the Americanized version has popularized chicken as the primary protein. The modern skillet version adapts these traditional flavors into a high-heat, stir-fry style environment, making it more accessible for home kitchens while retaining that signature glossy finish.
Why the Skillet Method Reigns Supreme
While you can bake teriyaki chicken or grill it on a barbecue, the skillet is arguably the best vessel for this dish. Here’s why:
- Temperature Control: Skillets, especially cast iron or heavy-bottomed stainless steel, provide consistent, high heat. This is crucial for achieving the “Maillard reaction”—the chemical reaction between amino acids and reducing sugars that gives browned food its distinctive flavor.
- Sauce Emulsification: In a skillet, the sauce reduces rapidly. As the water evaporates, the sugars caramelize and the proteins in the chicken juices meld with the soy sauce, creating a thick, clingy glaze that an oven simply cannot replicate.
- One-Pan Efficiency: Cleanup is a breeze. By sautéing your vegetables and searing your chicken in the same pan, you build layers of flavor. The “fond” (the browned bits at the bottom of the pan) gets deglazed by the teriyaki sauce, ensuring no flavor is wasted.
Anatomy of the Perfect Teriyaki Chicken Skillet
To create a restaurant-quality meal at home, you need to pay attention to each component. A Teriyaki Chicken Skillet is more than the sum of its parts.
1. The Protein: Choosing Your Chicken
The debate between chicken breast and chicken thigh is eternal.
- Chicken Thighs (Recommended): They have a higher fat content, which means they stay juicy even under high skillet heat. They absorb the marinade better and provide a richer flavor.
- Chicken Breasts: A leaner option for those watching calories. To prevent them from drying out, it is essential to slice them thinly and cook them quickly, or use a “velveting” technique (marinating in a bit of cornstarch and oil) to lock in moisture.
2. The Aromatics: The Flavor Foundation
Never skip the fresh aromatics. While powdered versions exist, nothing beats the punch of:
- Fresh Ginger: Provides a spicy, peppery heat that cuts through the sweetness of the sauce.
- Fresh Garlic: Adds depth and a savory aroma that defines the dish.
- Green Onions: Use the white parts for sautéing and the green parts for a fresh garnish.
3. The Vegetable Medley
A skillet meal is a fantastic way to clear out your crisper drawer. For the best Teriyaki Chicken Skillet, aim for a variety of textures:
- Crunchy: Broccoli florets, snap peas, or sliced carrots.
- Soft: Bell peppers (red, yellow, or orange for color).
- Savory: Sliced white onions or baby corn.
- Exotic: Water chestnuts or bamboo shoots for an authentic crunch.
The Golden Ratio: Crafting Homemade Teriyaki Sauce
While store-bought sauces are convenient, they are often loaded with high-fructose corn syrup and excessive preservatives. Making your own sauce takes five minutes and elevates the dish to a professional level.
The Essential Ingredients:
- Soy Sauce: The base. Use low-sodium if you want to control the saltiness.
- Sweetener: Traditionally mirin (Japanese rice wine) and sugar. Modern variations often use honey, maple syrup, or brown sugar for a deeper molasses flavor.
- Acid: A splash of rice vinegar or pineapple juice to balance the sugar.
- Thickener: A cornstarch slurry (cornstarch mixed with cold water) is the secret to getting that thick, “gloopy” sauce that coats every inch of the chicken.
Step-by-Step Guide to the Ultimate Teriyaki Chicken Skillet
Follow these steps to ensure your chicken is never rubbery and your vegetables are never mushy.
Step 1: The Preparation (Mise en Place)
In a skillet meal, things move fast. Slice your chicken into bite-sized 1-inch cubes. Chop your vegetables into uniform sizes so they cook evenly. Mince your garlic and grate your ginger. Whisk your sauce ingredients in a small bowl.
Step 2: Searing the Protein
Heat a tablespoon of high-smoke-point oil (like avocado or canola oil) in your skillet over medium-high heat. Add the chicken in a single layer. Do not crowd the pan. If you add too much chicken at once, the temperature drops, and the chicken will boil in its own juices rather than sear. Let it sit undisturbed for 2-3 minutes to get a golden-brown crust. Flip and cook until almost done, then remove the chicken from the pan and set it aside.
Step 3: Stir-Frying the Vegetables
In the same pan (don’t wash it!), add another drop of oil if needed. Toss in your harder vegetables first (carrots, broccoli). After 2 minutes, add the softer vegetables (peppers, onions). Stir-fry until they are “tender-crisp”—bright in color but still having a bite.
Step 4: The Integration
Push the vegetables to the sides of the pan. Add the garlic and ginger to the center for 30 seconds until fragrant. Pour in your prepared teriyaki sauce.
Step 5: The Glaze
As the sauce begins to bubble, add the chicken (and any juices from the plate) back into the skillet. If using a cornstarch slurry, pour it in now. Toss everything together vigorously. Within 60 seconds, the sauce will transform from a thin liquid into a shiny, thick glaze that hugs every piece of chicken and broccoli.
Step 6: The Garnish
Turn off the heat. Sprinkle with toasted sesame seeds and sliced green onions. For a bit of heat, add red pepper flakes or a drizzle of sriracha.
Dietary Variations and Substitutions
The beauty of the Teriyaki Chicken Skillet is its versatility. You can adapt it to almost any dietary requirement.
1. The Keto / Low-Carb Version
To make this keto-friendly:
- Swap the Soy Sauce: Use Coconut Aminos or liquid aminos.
- Swap the Sugar: Use a brown sugar alternative like Monkfruit or Erythritol.
- Swap the Thickener: Omit cornstarch and allow the sauce to reduce naturally, or use a tiny pinch of Xanthan gum.
- The Base: Serve over cauliflower rice instead of white rice.
2. The Gluten-Free Version
Standard soy sauce contains wheat. To make this dish gluten-free, simply use Tamari or certified gluten-free soy sauce. Ensure your cornstarch is processed in a gluten-free facility.
3. The Tropical Twist (Pineapple Teriyaki)
For a sweeter, Hawaian-inspired flavor, add fresh pineapple chunks to the skillet during the last few minutes of cooking. Use the pineapple juice as part of your sauce base. The acidity in the pineapple also acts as a natural meat tenderizer.
4. The Vegan “Chicken” Skillet
You can use the exact same technique with:
- Extra Firm Tofu: Press the water out first, cube it, and toss it in cornstarch before frying for a crispy exterior.
- Tempeh: Provides a nutty, fermented flavor that pairs beautifully with ginger.
- Seitan: Known as “wheat meat,” it has a texture remarkably similar to chicken.
The Science of Flavor: Why This Dish Works
To understand why we crave Teriyaki Chicken, we look at the “Five Tastes.” This dish manages to hit all of them:
- Salty: From the soy sauce.
- Sweet: From the sugar or honey.
- Sour: From the rice vinegar.
- Bitter: From the charred edges of the seared chicken or slightly charred broccoli.
- Umami: The “fifth taste,” provided by the fermented soy and the cooked proteins.
When all five tastes are present, the brain perceives the meal as highly satisfying, which is why you rarely feel like you’re missing something when eating a well-made teriyaki skillet.
Essential Kitchen Tools for the Best Results
While any pan will work, certain tools will make your life easier and your food tastier:
- Cast Iron Skillet: Its heat retention is unparalleled, creating the best sear on your chicken.
- Microplane Grater: Perfect for turning a knob of ginger or a clove of garlic into a fine paste that melts into the sauce.
- Carbon Steel Wok: If you prefer a lighter pan that allows for “tossing” the ingredients, a wok is a great alternative to a flat skillet.
- High-Heat Spatula: Silicone or metal spatulas that won’t melt when you’re scraping the bottom of the pan for those delicious browned bits.
Meal Prepping the Teriyaki Chicken Skillet
This dish is a meal-prepper’s dream because it actually tastes better the next day as the chicken continues to marinate in the sauce.
- Storage: Store in airtight containers for up to 4 days in the refrigerator.
- Reheating: To keep the chicken from getting rubbery, reheat it in a skillet over medium heat with a splash of water or chicken broth to loosen the sauce. If using a microwave, cover with a damp paper towel to retain moisture.
- Freezing: You can freeze the cooked meal, but note that vegetables like bell peppers may lose their crispness upon thawing. For best results, freeze the marinated raw chicken and the sauce separately, then cook fresh.
Common Mistakes and How to Avoid Them
Even with a simple dish, there are pitfalls. Here is how to troubleshoot your Teriyaki Chicken Skillet:
1. “My sauce is too thin.”
- Solution: You likely didn’t use enough cornstarch or didn’t let the sauce come to a full boil. The starch only activates at high temperatures. Mix 1 teaspoon of cornstarch with 1 teaspoon of water and stir it back into the bubbling sauce.
2. “My chicken is tough and dry.”
- Solution: You probably overcooked it during the initial sear. Remember, the chicken will finish cooking when you add it back into the sauce. Aim for “just done” during the first phase. Also, consider switching to chicken thighs.
3. “The garlic burned.”
- Solution: Garlic burns very quickly (in about 30-60 seconds). Never add it at the beginning with the chicken. Always add it at the end of the vegetable stir-fry right before the liquid sauce.
4. “It’s too salty.”
- Solution: This happens if the sauce reduces too much or if you used full-sodium soy sauce. You can balance excess salt by adding a squeeze of lime juice or a little more sweetener.
Perfect Pairings: What to Serve with Your Skillet
The Teriyaki Chicken Skillet is a powerhouse on its own, but the right side dish can transform it into a full feast.
- Grains:
- Jasmine Rice: The floral aroma complements the ginger.
- Brown Rice: For a nuttier flavor and extra fiber.
- Quinoa: A modern, high-protein twist.
- Noodles: Toss the skillet contents with udon, soba, or even linguine for a “Teriyaki Noodle” experience.
- Salads: A simple cucumber salad with rice vinegar and sesame oil provides a cooling contrast to the warm, savory skillet.
- Drinks: Pair with a crisp Japanese lager, a chilled Sake, or a ginger-infused sparkling water.
Advanced Pro Tips for the Home Chef
If you’ve made this dish a dozen times and want to take it to the next level, try these “pro” techniques:
- Toasting the Aromatics: Before adding the sauce, toast your dry spices (like a pinch of star anise or Szechuan peppercorns) in the center of the skillet to release their essential oils.
- The “Luster” Finish: For that professional shine, stir in a tiny knob of cold unsalted butter right at the end after turning off the heat. This technique, called monter au beurre, gives the sauce a velvety mouthfeel and a brilliant glow.
- Velveting the Chicken: This is a Chinese restaurant secret. Toss your raw chicken pieces in a mixture of egg white, cornstarch, and a splash of rice wine for 20 minutes before cooking. This creates a protective barrier that keeps the meat incredibly tender, even at high heat.
- Charred Broccoli: Instead of steaming the broccoli in the sauce, char it separately in the skillet with a bit of oil until the edges are black and crispy. This adds a smoky dimension to the dish.
Frequently Asked Questions (FAQs)
Q: Can I use frozen chicken? A: Yes, but you must thaw it completely and pat it dry with paper towels before cooking. Any excess moisture will prevent the chicken from searing and will result in a “steamed” texture.
Q: Is Teriyaki Chicken healthy? A: It can be! By making your own sauce, you control the sugar and sodium. It’s packed with lean protein and fiber-rich vegetables. To make it even healthier, serve it over greens or cauliflower rice.
Q: Can I make this in a slow cooker? A: You can, but you will lose the “Yaki” (grill/sear) element. The texture will be more like a stew. If you use a slow cooker, we recommend browning the chicken in a skillet first to develop flavor.
Q: How do I make the sauce spicy? A: Add fresh sliced chili peppers (like Thai bird’s eye chilies) with the garlic, or stir in a tablespoon of Gochujang (Korean chili paste) or Sriracha into the sauce mixture.
Nutritional Profile of a Standard Teriyaki Chicken Skillet
Based on a standard serving with chicken thighs, broccoli, bell peppers, and homemade sauce (without rice).
- Calories: 350-450 kcal
- Protein: 30g – 35g
- Carbohydrates: 15g – 20g (mostly from the sweetener and vegetables)
- Fats: 12g – 18g (depending on the use of oil and thighs vs. breasts)
- Vitamins: High in Vitamin C (from bell peppers), Vitamin K (from broccoli), and B6 (from chicken).
Final Thoughts: The Joy of One-Pan Cooking
The Teriyaki Chicken Skillet is more than just a recipe; it’s a framework for culinary creativity. It teaches the fundamentals of heat management, flavor balancing, and efficient cooking. Once you master the basic ratio of the sauce and the timing of the skillet, the possibilities are endless.
Whether you are cooking for a family of four or prepping your lunches for the week, this dish offers a level of satisfaction that few other “quick meals” can provide. It is proof that you don’t need a pantry full of exotic ingredients or hours of free time to create something truly spectacular.
So, get your skillet screaming hot, prep your ginger and garlic, and get ready to enjoy the best Teriyaki Chicken you’ve ever had—made right in your own kitchen.
Summary Checklist for Success
- Dry the chicken: Moisture is the enemy of a good sear.
- Use fresh ginger/garlic: It makes a world of difference over the jarred stuff.
- Don’t overcook the veggies: Keep them bright and snappy.
- The Slurry is Key: Don’t forget the cornstarch if you want that iconic thick glaze.
- Garnish: Never underestimate the power of green onions and sesame seeds for both flavor and aesthetics.
The Teriyaki Chicken Skillet remains a staple in American households for a reason. It is the ultimate comfort food that bridges the gap between healthy eating and indulgent flavor. Happy cooking!